Most people will spend hours tweaking monitor settings, upgrading keyboards, and adjusting chair height, then ignore the one thing their eyes deal with every second of the workday. The 2026 Workplace Vision Health Report from VSP Vision Care and Workplace Intelligence found desk workers now average 99.2 hours of screen time a week, which is 93% of their waking weekday hours, and 71% report screen-related visual discomfort. The same share says it directly reduces their productivity (VSP Vision Care / Workplace Intelligence, 2026). A proper home office lighting setup is about more than stopping headaches. It sharpens focus, steadies your energy through the day, and makes every other ergonomic upgrade work better. Getting the best lighting for your home office does not require expensive gear. It requires understanding what your eyes actually need: consistent, glare-free illumination across four distinct zones. This guide walks through the four layers in the order that matters: natural, ambient, task, and bias. It is principles-first rather than a product roundup. Where specific gear genuinely matters, the buying guide is linked. Getting these principles right is the difference between a room that drains you and one that keeps you sharp.
In a Hurry? Start Here
- Light directly affects productivity: studies link poor office lighting to increased eye strain, headaches, and reduced focus duration. Most home offices fail basic lighting standards.
- Four layers make a system: natural, ambient, task, and bias lighting each serve a distinct biological purpose. Fixing just one layer leaves performance on the table.
- Zero-cost fixes come first: repositioning your desk relative to windows, matching monitor brightness to ambient light, and reducing screen-to-wall contrast are free and effective before any purchase.
Table of Contents
Disclosure: TechDeskZone is reader-supported. When you buy through links on our site, we may earn an affiliate commission at no additional cost to you. See our affiliate disclosure for details.
I’ve rebuilt my home office lighting in stages over five years, and the lesson that stuck is that the layers compound. Fixing window glare did little until I added task light, and bias lighting only landed once the ambient layer was sorted. The four-layer system below is the order that finally worked: fix from the outside in, and each change makes the next one worth doing.
Why Office Lighting Matters for Your Eyes and Focus
In 2026, 71% of desk workers said screen-related visual discomfort directly reduces their productivity and effectiveness at work, an average loss of 18.6% of productive time, or 7.4 hours a week (VSP Vision Care / Workplace Intelligence, 2026 Workplace Vision Health Report). The same research found desk workers average 99.2 hours of screen time per week, up from 97 in 2025.
Your eyes weren’t designed for this. The mechanisms at play sit on two tracks.
First, the circadian track. Your brain’s master clock, the suprachiasmatic nucleus, syncs to light through melanopsin-containing retinal ganglion cells, which peak in sensitivity around 482 nm (blue light). Morning light exposure suppresses melatonin and triggers cortisol release, setting your alertness curve for the day. Get this right and you feel awake without trying. Get it wrong (working in a dim room until noon, then blasting cool-white overheads at 9pm) and your body never knows what time it’s supposed to be. You end up wired when you should be winding down and foggy when you need to focus.
Second, the mechanical track. Your pupils constantly adjust to the brightest thing in your field of view. When a bright screen floats in a dark room, your pupils cycle between constriction (looking at the screen) and dilation (glancing away). Multiply that by thousands of cycles per day and you get the tired-eye feeling that builds toward 3pm. Add overhead lights casting glare onto your screen, or a window behind your monitor blasting silhouette-level contrast, and the strain compounds.
The Vision Council’s 2016 digital eye strain survey of 10,329 US adults found 65% reported symptoms of digital eye strain (The Vision Council, 2016). In a separate survey of 520 New York City office workers, 26.3% said sensitivity to bright lights bothered them at least half the time while using a computer (Portello et al., 2012). The UK numbers are consistent: an Ocushield survey in 2025 found roughly one in three office workers report headaches or migraines linked to screen use, and up to 80% of those with regular eye strain also report neck, shoulder, or back pain, likely from unconsciously leaning or craning to escape glare. The same survey found half of 2,000 UK office workers regularly experience eye strain at work, costing nearly 40 minutes of productivity a day.
Most ergonomic advice treats lighting, chair setup, and monitor positioning as separate problems. The 80% overlap between eye strain and musculoskeletal pain suggests a causal chain: bad lighting drives unconscious postural compensation, which turns into neck and shoulder pain. Fix the light first, and posture corrections become easier to hold because you’re not fighting glare at the same time.
The four-layer system (natural, ambient, task, bias) addresses each of these mechanisms at its source. Here’s how each one works, starting from the outside in.
Layer 1: Natural Light, Your Free Productivity Tool
Natural light is the most powerful lighting tool in any office, and it costs nothing. It’s also the one most people get wrong.
Morning light exposure, ideally 15 to 30 minutes within the first hour of waking, is the primary signal that sets your circadian clock. Research from the Lighting Research Center at Rensselaer Polytechnic Institute has consistently shown that daytime light exposure, particularly in the short-wavelength (blue) range, improves subjective alertness, reaction time, and cognitive performance compared to dim or windowless conditions. You don’t need direct sunlight on your face. Indirect daylight through a window, even on an overcast morning, delivers enough lux to trigger the cortisol response that drives daytime alertness.
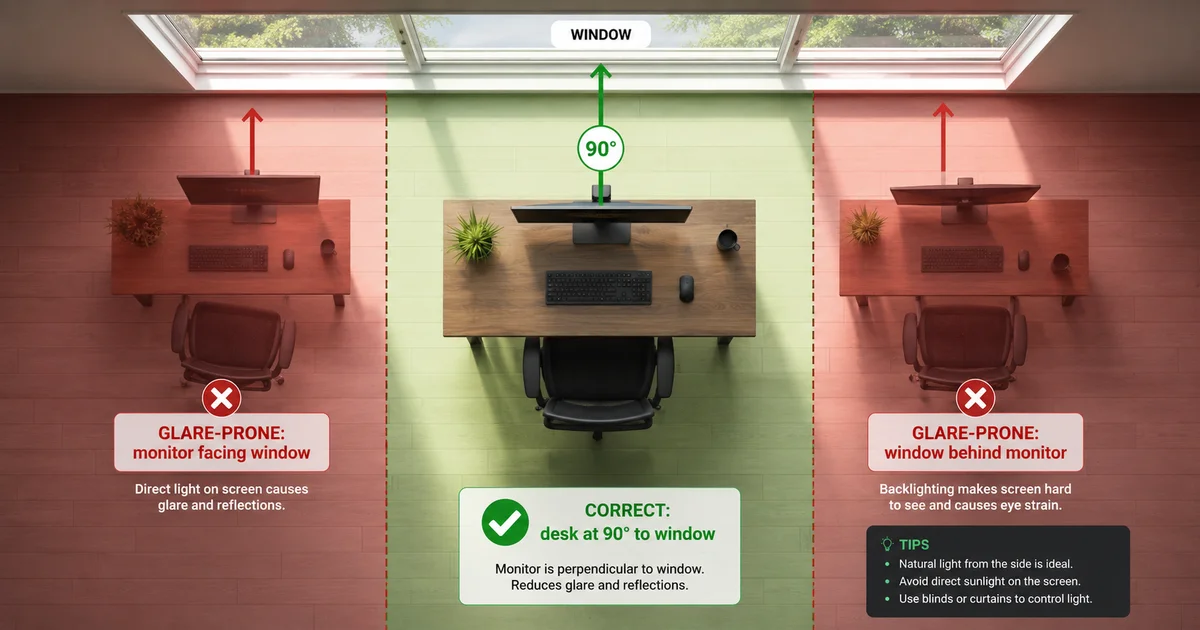
The practical takeaway: position your desk so daylight reaches your eyes in the morning. If you face a wall with a window behind you, you’re missing the circadian benefit entirely. If the window is behind your monitor, you’re creating the worst possible glare condition: bright backlight forcing your pupils to constrict against a screen they can barely read.
Glare management is the second half of the natural-light equation. Direct sunlight hitting your screen forces your monitor’s perceived contrast ratio toward zero. You’re essentially reading through a veil of reflected light. Fixes, in order of cost: adjust blind slats to deflect light upward rather than blocking it entirely (preserves daylight while killing direct glare), reposition the monitor angle slightly downward to avoid catching window reflection, or (for south-facing rooms that get hammered all day) install sheer diffusion blinds that scatter direct sun into soft ambient fill.
North-facing rooms get weaker but more consistent light throughout the day. They’re easier to work with because you rarely fight direct glare, but you’ll need more supplemental ambient and task light. South-facing rooms (north-facing in the southern hemisphere) get stronger, warmer light that shifts dramatically from morning to afternoon. Great for natural rhythm cues but demanding on glare control. East-facing offices get strong morning light (circadian gold) and fade by afternoon. West-facing ones do the opposite: dim mornings, then harsh low-angle sun from 4pm onward. Each orientation works; you just adapt the strategy.
If you use a sit-stand desk, and if you’ve already sorted out a solid setup with a standing desk, pay attention to how your relationship to the window changes when you switch from sitting to standing. What’s glare-free seated may become a direct reflection when you’re six inches higher.
Layer 2: Ambient Light, the Room Foundation
Ambient light is the room’s baseline: the ceiling fixture, overhead panels, or wall-mounted sources that fill the space. Done right, it creates an even, shadow-free environment your task and bias layers sit on top of. Done wrong, it’s the single biggest source of screen glare and eye fatigue in a home office.
How bright? The Illuminating Engineering Society (IES) recommends 300-500 lux at the work surface for general office tasks, rising to 500-1,000 lux for detailed or prolonged screen work. For context, a typical living room at night sits around 50-100 lux. Most home offices are dramatically under-lit. The ceiling fixture was chosen for a bedroom or spare room, not for eight hours of focused screen work.
You can measure your actual lux level with a free smartphone light meter app. Hold it at desk height where your hands work. If you’re below 200 lux, your eyes are compensating by dilating further, which reduces depth of field and forces your ciliary muscles to work harder to keep the screen in focus. That’s the mechanism behind the “everything looks fine but my eyes feel tired” sensation that creeps up by mid-afternoon.
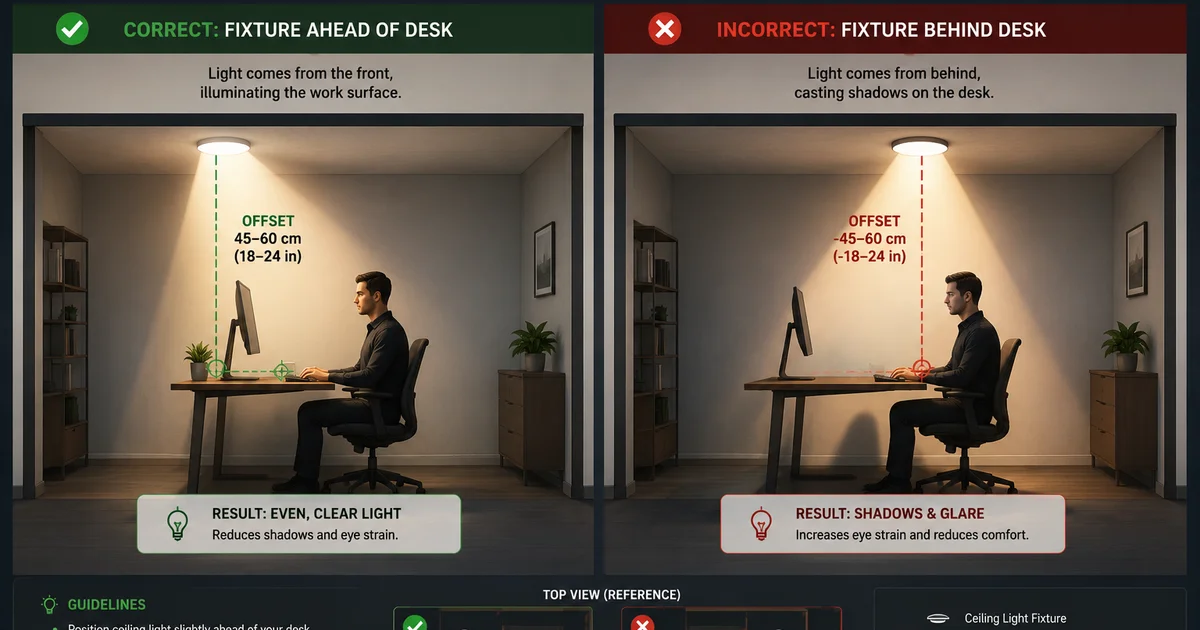
Position matters as much as brightness. A single ceiling light directly behind your seated position casts your own shadow onto the desk and screen. You’re working in your own silhouette. The fixture should sit slightly ahead of your primary work position, or be supplemented with wall-mounted or floor-standing sources that fill from the sides. If you can’t move the fixture, add a secondary source. Even a floor lamp placed to one side breaks up the single-point shadow problem.
Color temperature is where ambient light connects directly to your circadian system. The sweet spot for daytime work is 4000K-5000K, cool white that signals “daytime, be alert” to your brain. This matches the color temperature of natural midday light and supports the cortisol-driven focus window that peaks between 9am and 2pm for most people.
In the evening, particularly the last two hours before bed, shift toward 2700K-3000K warm white. This reduces melanopsin stimulation and lets melatonin production begin on schedule. If your overhead fixture isn’t tunable, a single warm desk-side lamp switched on after 7pm accomplishes the same thing without touching the ceiling.
Dimmable vs fixed is where I’ve learned to be pragmatic. A dimmable overhead fixture is ideal. You can run it bright (4000K, 400+ lux) during peak work hours and dial it down (3000K equivalent, roughly 150 lux) in the evening. But if rewiring isn’t practical, a two-source setup accomplishes the same thing: bright overhead for daytime, warm desk lamp for evening. The principle is tunability. How you achieve it matters less than whether you have the option.
My own home office is a north-facing spare room with a single central ceiling fixture. For two years I ran it at full brightness all day and wondered why I felt wired at 10pm. Adding a small 2700K table lamp and switching to it after dinner made more difference to my sleep onset than any other change, blue-light glasses included. A 2023 Cochrane review found those lenses probably make little to no difference to eye strain, with their effect on sleep still unclear.
Layer 3: Task Light, Where the Work Happens
Task lighting is the directed beam that illuminates your immediate work area: the desk surface, keyboard, notepad, or reference document. It’s the most personal layer because it follows your specific workflow. Where your hands go, where you read, where you write.
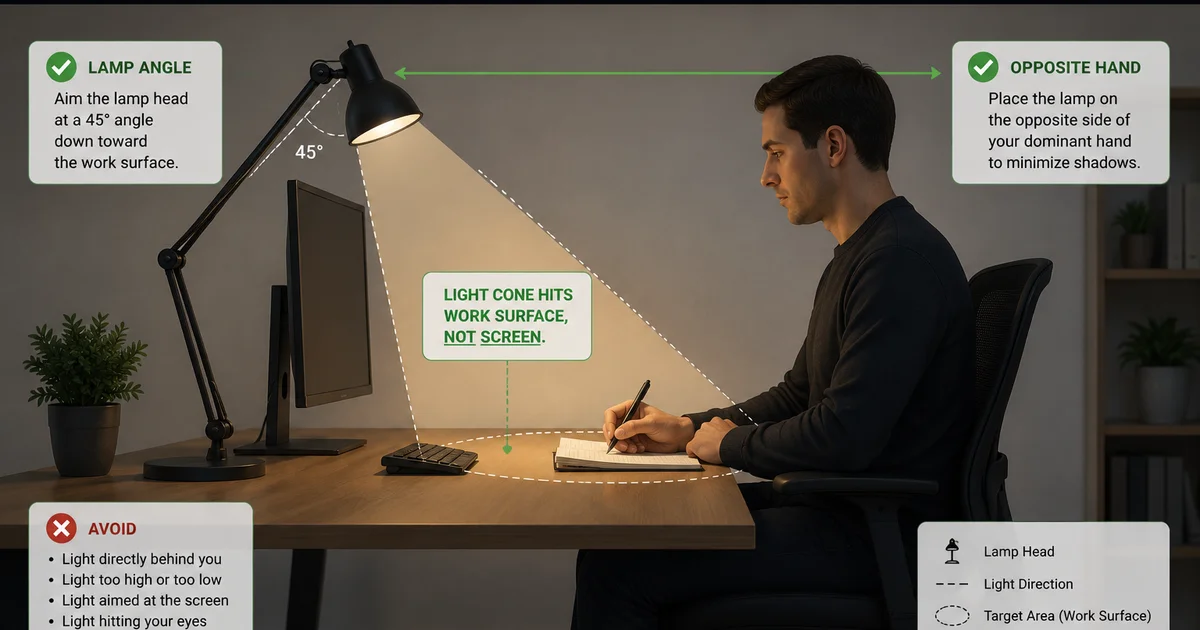
Desk lamps remain the workhorse here. The spec to look for: adjustable arm (gooseneck or articulated), CRI 90+ (Color Rendering Index, which measures how accurately colors appear under the light), and enough reach to position the head so the beam hits your desk surface without casting shadows from your own hand. Position the lamp on the side opposite your dominant hand. Right-handers put it on the left, left-handers on the right. This way your writing hand doesn’t cast a shadow across whatever you’re working on.
A 2025 UK survey found a connection that’s easy to overlook: up to 80% of employees who report regular eye strain also experience neck, shoulder, or back pain (Ocushield). The mechanism isn’t hard to trace. When your task light creates glare or your screen is too bright relative to the room, you instinctively tilt your head, crane forward, or twist to find a glare-free angle. After six hours, that compensation shows up as muscle pain. Good office lighting for eyes isn’t just about brightness. It’s about direction, contrast, and eliminating the reflection spots that drive postural compensation.
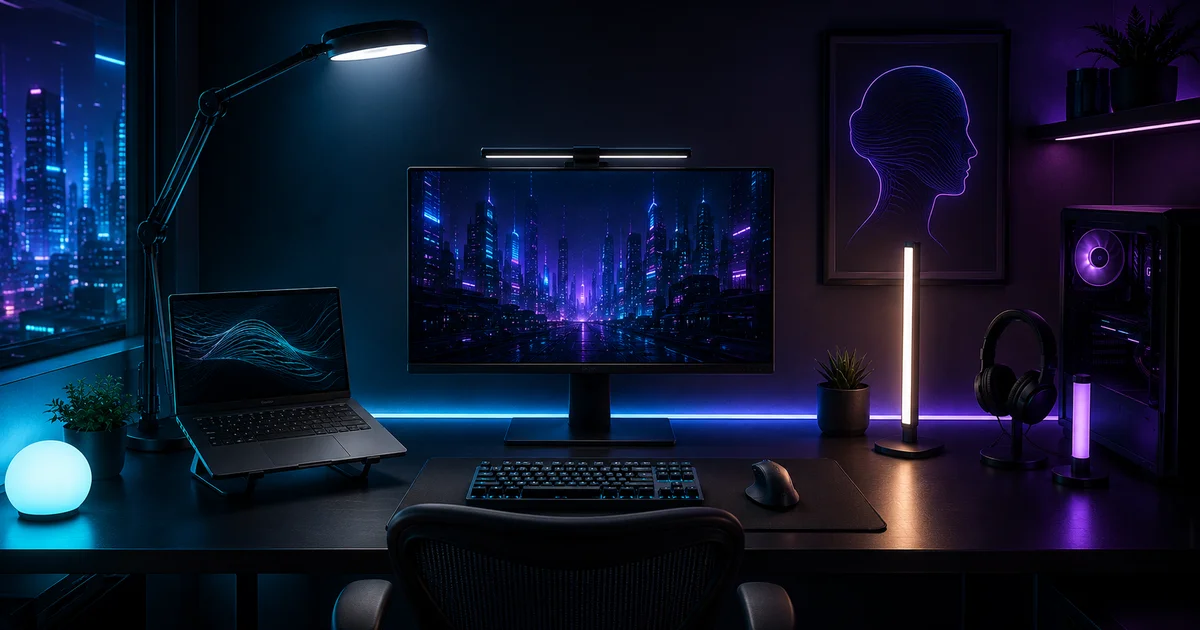
Monitor light bars solve a specific problem that desk lamps can’t: illuminating the area directly in front of your screen without casting light onto the display itself. They use asymmetric optics: a shaped lens that directs all light downward at roughly a 45° angle, hitting only the desk surface in front of the monitor. A good one makes papers, notes, and your keyboard visible without introducing a single reflection on the screen. The science of what makes them work (and how to pick one that actually delivers on its CRI claims) is worth its own deep dive. I covered the methodology and tested five current models in the monitor light bar guide.
Under-shelf and under-cabinet lights are the third option, particularly for desks built into shelving systems or alcoves. A slim LED strip mounted to the underside of the shelf above your monitor floods the desk surface evenly, with zero footprint. The catch: they’re fixed in position, so they only work if your desk setup is stable. If you regularly reconfigure your workspace, an adjustable desk lamp gives you the flexibility a fixed strip can’t.
Glare avoidance rule of thumb: Turn on your task light and look at your screen from your normal seated position. If you can see the light source reflected anywhere on the display, even faintly, it’s in the wrong position. The light should hit your desk, your papers, your keyboard. Never the screen.
This layer is also where getting your screen height right matters. If you’re squinting because your monitor is too high or too low, no amount of task lighting fixes it. The ergonomic chain connects everything: monitor positioning determines head angle, head angle determines where your eyes catch reflections, and task light position either works with that geometry or fights it.
Layer 4: Bias Light, What’s Behind the Screen
Bias lighting is the least obvious layer and, in my experience, the one that produces the most immediate “oh, that’s better” reaction when someone tries it for the first time. Of the four ways to reduce eye strain, lighting behind the screen is the one most home offices skip entirely. It’s also the one that requires zero ongoing effort once installed.
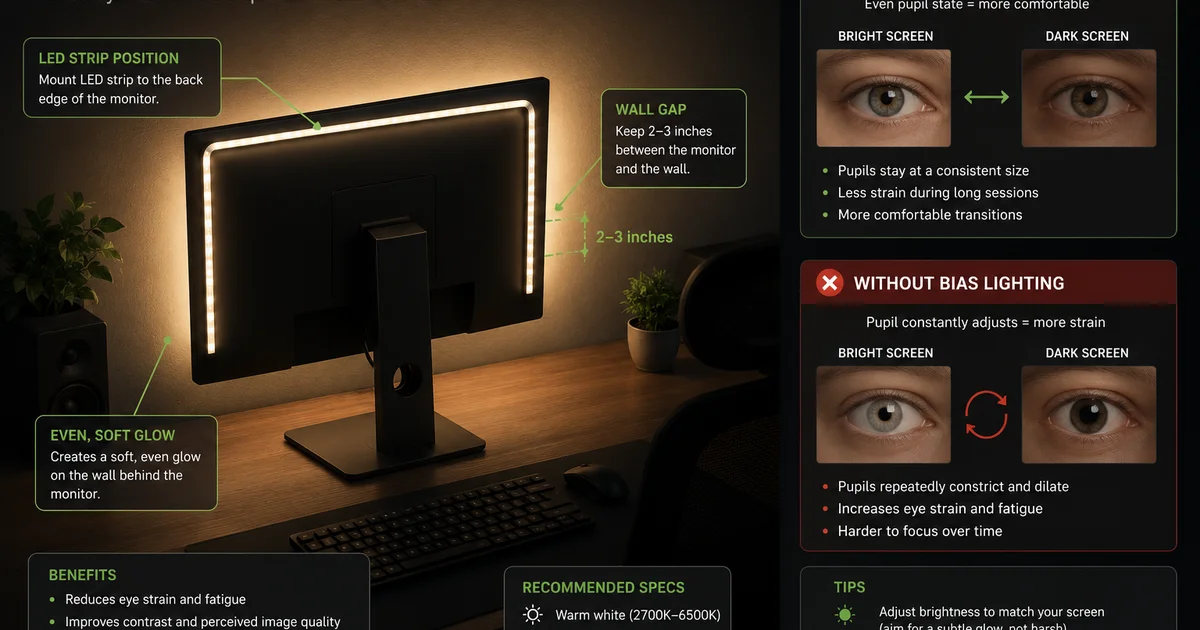
The problem it solves: your monitor is a bright rectangle floating in a dark void. When you look at the screen, your pupils constrict to match its luminance. When you glance away (to grab a pen, check your phone, or just look up to think), your pupils dilate to match the darker wall behind it. Over a workday, you’re cycling between these two states thousands of times. The ciliary muscles that control pupil diameter fatigue the same way any overworked muscle does.
Bias lighting breaks this cycle by raising the luminance of the wall behind your monitor to somewhere close to the screen’s average brightness. The goal isn’t to match the screen exactly. It’s to reduce the contrast ratio enough that your pupils stop seesawing. The result isn’t dramatic in the moment, which is why bias lighting gets less attention than it deserves. It’s dramatic at 5pm when you realise you don’t have the usual end-of-day eye ache.
Color temperature matters here more than most people think. Your bias light should be close to your monitor’s native white point, typically 6500K (D65, the standard white point for most displays). When the wall behind your screen is the same color temperature as the screen itself, your visual system treats them as a continuous surface rather than two competing light sources. LED strips marketed as “RGB bias lighting” that cycle through colors are entertainment products. They’re designed to look cool, not to reduce eye strain. Skip them for a fixed 6500K white strip.
Placement: Mount the LED strip or bias light bar 2-3 inches from the wall surface behind your monitor. Too close and you get a harsh halo directly around the screen edges. Too far and the light diffuses too much to make a meaningful luminance difference. The strip should run along the back edges of the monitor (top, left, and right), creating a soft, even glow on the wall. Ideally, the light itself is never directly visible from your seated position; you only see its indirect reflection on the wall.
Not just for night use. Bias lighting helps most when the room is dim: evening work, overcast days, windowless offices. But it also helps during the day if your monitor faces a dark wall. The principle is contrast reduction, not brightness addition. If the wall behind your monitor is already well-lit at 300+ lux with soft ambient light, bias lighting adds less value. If it’s a dark surface in shadow, bias lighting makes a measurable difference regardless of time of day. Larger screens, the kind that make choosing between 27 and 32 inches a real decision, create more wall contrast by sheer surface area, so the bias light payoff scales with screen size.
Most bias lighting advice treats it as a nighttime-only tool. But the underlying mechanism (reducing pupil cycling from luminance contrast) operates whenever there’s a meaningful brightness gap between screen and surrounding wall. A dark accent wall behind your monitor at 2pm creates the same cycling as a dark room at 10pm. The fix is the same either way.
Designing Your Full Lighting System
Each layer works independently, but they interact in ways that matter. Here’s how to think about them as one system rather than four separate decisions.
The Zone Checklist
Walk through your office and check each zone, in this order:
- Window zone: Is your desk at 90° to the window? Can you see daylight from your seated position? Does direct sun ever hit your screen? If yes to the last one, add blinds or diffusion before touching anything else.
- Ceiling zone: Is your overhead light ahead of you (not behind, casting your shadow onto the desk)? Is it 300+ lux at desk height? Is it 4000K-5000K? If it’s dimmer or warmer than these targets, supplement before you compensate with task lighting alone.
- Desk zone: Is your task light opposite your dominant hand? Does its beam hit the desk surface without reflecting on your screen? If you have a monitor light bar, is it actually using asymmetric optics (not just a downward-facing LED strip)?
- Wall-behind-monitor zone: Is there a dark wall directly behind your screen? Is the contrast between screen brightness and wall brightness jarring when you look away? If yes, 6500K bias lighting 2-3 inches from the wall surface.
Time-of-Day Adjustments
- Morning (7am-12pm): ambient 4000K-5000K at full brightness; task light on, matched to ambient; bias light on if dark wall; natural light: maximise exposure, blinds open, face daylight direction.
- Afternoon (12pm-5pm): ambient 4000K-5000K at full brightness; task light on; bias light on if dark wall; natural light: manage glare, adjust blinds not block.
- Evening (5pm-8pm): ambient 3000K-3500K reduced; task light on, warmer if adjustable; bias light on; natural light: blinds optional, ambient already warm.
- Night (8pm+): ambient 2700K-3000K dim; task light off or warm + low; bias light optional; natural light: blinds closed, block streetlights and security lights.
Common Mistakes
- Single overhead light behind you. Casts your shadow onto the desk. Either move the fixture, supplement with side sources, or reposition your desk.
- Window directly behind monitor. Maximum glare, maximum pupil cycling. Desk at 90° to window fixes this in two minutes.
- Mismatched color temperatures. 6500K bias light + 2700K desk lamp + 4000K overhead = three competing white points your brain can’t reconcile. Match everything during daytime work to 4000K-5000K.
- Too dim because “it feels cosy.” Cosy is for living rooms. Your visual system needs 300+ lux for focus work. Measure it. Don’t guess.
- Ignoring the evening transition. Bright cool light at 9pm tells your brain it’s noon. Warm + dim after dinner. Every night.
Budget Approach
- Zero-cost: reposition desk to window, remove glare sources, enable night-mode warm shifting on all screens, reduce screen brightness to match ambient. Cost: £0 / $0. Covers circadian alignment and glare reduction. In my experience this clears most of the common lighting problems before you spend anything.
- Modest: add one dimmable 4000K desk lamp (positioned correctly) plus a 6500K LED bias strip behind the monitor. Cost: £50-150 / ~$65-190. Adds task + bias layers on top of the zero-cost fixes. Covers most of what a typical home office needs.
- Full system: tunable-white overhead fixture + CRI 95+ task lamp + dedicated bias light bar + smart controls for time-of-day automation. Cost: £150-350+ / ~$190-440+. All four layers with automated transitions. Worth it if lighting-sensitive or working long hours.
The budget tiers are about principles, not products. The zero-cost tier alone (repositioning your desk relative to the window, matching screen brightness to ambient light, and enabling warm-shift scheduling on your devices) addresses the majority of what causes eye strain in home offices. The modest tier adds directed task light and bias light, which handle the remaining mechanical causes: shadow-on-work-surface and screen-to-wall contrast. The full system adds automation and tunability for people who want to set it once and not think about it again.
If you’ve already tackled your desk and chair ergonomics, sorted out wrist pain prevention and added an ergonomic footrest, lighting is the next priority. Good posture and good lighting reinforce each other. Bad lighting undermines ergonomic investments because you’ll unconsciously twist, lean, and crane to escape glare regardless of how well-adjusted your chair is.
None of this requires a renovation or a big budget. Start with the zero-cost fixes: desk at 90° to the window, screen brightness matched to the room, and a warm shift after dinner. Most of the strain lifts without a single purchase. Add task light and bias light only if that first pass leaves a gap. Light is the cheapest ergonomic upgrade in your office, and unlike a chair or keyboard, you can usually feel the difference by the end of the first week.
Q&A
What’s the best color temperature for a home office?
4000K-5000K during daytime work hours. This range matches natural midday light and supports alertness via the circadian system’s blue-light response. In the evening, roughly the last two hours before bed, shift to 2700K-3000K to allow natural melatonin production. A single fixed temperature across the whole day is a compromise: 4000K splits the difference reasonably well if you can’t adjust.
Do monitor light bars actually reduce eye strain?
Yes, when they use proper asymmetric optics. A 2026 VSP report found 71% of desk workers experience screen-related visual discomfort, and poor task-area illumination is a contributing factor because people crank screen brightness to compensate for a dark desk. A monitor light bar with genuine asymmetric optics directs light onto the desk surface without hitting the screen, so you can read notes and see your keyboard without glare-driven squinting. Cheap bars that lack proper optics just scatter light everywhere and make things worse. See the monitor light bar guide for methodology on how to tell the difference.
How many lumens do I need for desk work?
Lumens measure total light output from a fixture; what matters at the desk is lux (lumens per square meter reaching the surface). The IES recommendation for office work is 300-500 lux at the work surface. A single 800-1,000 lumen desk lamp at typical mounting distance (45-60 cm from surface) delivers roughly 300-500 lux in its beam area. For ambient ceiling lights, 2,000-3,000 lumens total across the room typically achieves 300+ lux at desk height in a standard 10-12 m² home office, but the only way to know is to measure with a lux meter app at your actual work position.
Can bias lighting improve sleep?
Indirectly, yes, but through a specific mechanism. Bias lighting itself doesn’t affect melatonin (it’s behind your monitor, not in your direct line of sight at levels that would matter). What it does is reduce end-of-day eye fatigue by cutting pupil cycling throughout the workday. Lower fatigue at 5pm means less cortisol-driven alertness-compensation in the evening, which means an easier wind-down. The direct sleep lever is ambient color temperature in the last two hours before bed, not bias lighting.
Is natural light better than artificial for focus?
Yes, but “better” isn’t binary. Natural light’s advantage comes from three things: it’s full-spectrum (all visible wavelengths, CRI 100 by definition), it changes across the day (intensity and color temperature shifts that reinforce circadian timing), and it’s free. A properly designed artificial system (4000K-5000K ambient + CRI 90+ task + 6500K bias) can match natural light’s performance for focus. What it can’t replicate is the circadian-timing benefit of a shifting light environment across the day. The best setup uses natural light as the circadian anchor and artificial layers for consistency when daylight isn’t enough.
Sources
- VSP Vision Care / Workplace Intelligence, “2026 Workplace Vision Health Report,” February 2026, retrieved 2026-07-31. Source
- Ocushield / Obsurvant, “UK Workplace Eye Strain Survey,” June 2025, retrieved 2026-07-31. Source
- Sheppard AL, Wolffsohn JS, “Digital eye strain: prevalence, measurement and amelioration,” BMJ Open Ophthalmology, 2018, retrieved 2026-07-31. Source
- American Optometric Association, “Computer Vision Syndrome,” retrieved 2026-07-31. Source
- Illuminating Engineering Society, ANSI/IES RP-1, “Lighting Office Spaces,” retrieved 2026-07-31. Source
- Lighting Research Center, Rensselaer Polytechnic Institute, “Light and Health Program,” retrieved 2026-07-31. Source
- WorkinMind, “UK Workplace Eye Health Neglected, New Survey Finds,” April 2025, retrieved 2026-07-31. Source
- The Vision Council, “Eyes Overexposed: The Digital Device Dilemma: Digital Eye Strain Report,” 2016, retrieved 2026-07-31 via full-text mirror. Source
- Portello JK, Rosenfield M, et al., “Computer-related visual symptoms in office workers,” Ophthalmic & Physiological Optics, 2012;32(5):375-382. Source
- Singh S, et al., “Blue-light filtering spectacle lenses for visual performance, sleep, macular health and eye strain,” Cochrane Database of Systematic Reviews, 2023. Source
Last updated: 2026-07-31. Guide covers lighting principles; where specific products are relevant, they live in the linked buying guides. All statistics cited with source, year, and methodology where available.
The Verdict
Bottom line: Eye strain from poor office lighting is fixable. The four-layer lighting system, natural, ambient, task, and bias, addresses each mechanism that causes fatigue, from circadian disruption to pupil cycling from screen-to-wall contrast.
Quickest fix: Reposition your desk 90 degrees to the nearest window so natural light hits your workspace without casting glare on your screen. Free, takes two minutes, and eliminates the most common lighting mistake in home offices.
Best permanent fix: Layer all four lighting types with consistent color temperature across the room, 4000K-5000K daytime, a CRI 90+ adjustable task lamp, and 6500K bias lighting behind your monitor. This creates a stable lighting environment that supports focus from morning to evening.
← Back to Ergonomics Hub